
Pterodactyl is a software for managing game servers. As it’s still in development, installing it in some environments is not straight-forward. You should read the official docs along. The guide is written for Plesk with CentOS but could be helpful for other panel users like cPanel too.
Originally published 9. Sep 2017
EDIT (7. Feb 2018): Fixed error thanks to samyratchet
EDIT (15. Mar 2018): Updated for Pterodactyl v0.7.6
EDIT (28. Jun 2018): Updated for Pterodactyl v0.7.7
EDIT (06. Mar 2019): Updated for Pterodactyl v0.7.13
EDIT (11. May 2020): Updated for Pterodactyl v0.7.17; Added screenshots
EDIT (6. Dec 2020): Updated for Pterodactyl v1.1.1; Use –user SystemD
EDIT (22. Oct 2022): I am now using Portainer/Docker for the Panel, which is much easier, see here.
Contents
Web host/Plesk configuration
WARNING: According to Pterodactyl MySQL 5 should still work, however I run into issues. You need MINIMUM MariaDB 10.2 (10.1 is too old, too). If mysql --version reports not 10.2 or higher, you will have to use this tutorial to upgrade your database.
Read very carefully. Especially if you are not that experienced with Linux. Don’t copy-paste multiple lines into the console; and think about what you are doing. I use CentOS 7/8 for this tutorial, but it can be easily applied to Ubuntu by simply googling the respective commands. If you are not comfortable with this, you probably should not try to use this panel.
Log into to your SSH console (we start with root) and install the Redis and PHP packages. Here are the commands for CentOS (the epel repository is a requirement on CentOS 7 for Redis):
# for CentOS 7
yum install epel-release

yum update
yum install redis
plesk installer --select-release-current --install-component php7.4
yum install plesk-php74-redis plesk-php74-cli plesk-php74-bcmath plesk-php74-gd plesk-php74-mbstring plesk-php74-mysql plesk-php74-pdo plesk-php74-xml
Start redis and enable autostart:
systemctl start redis
systemctl enable redis
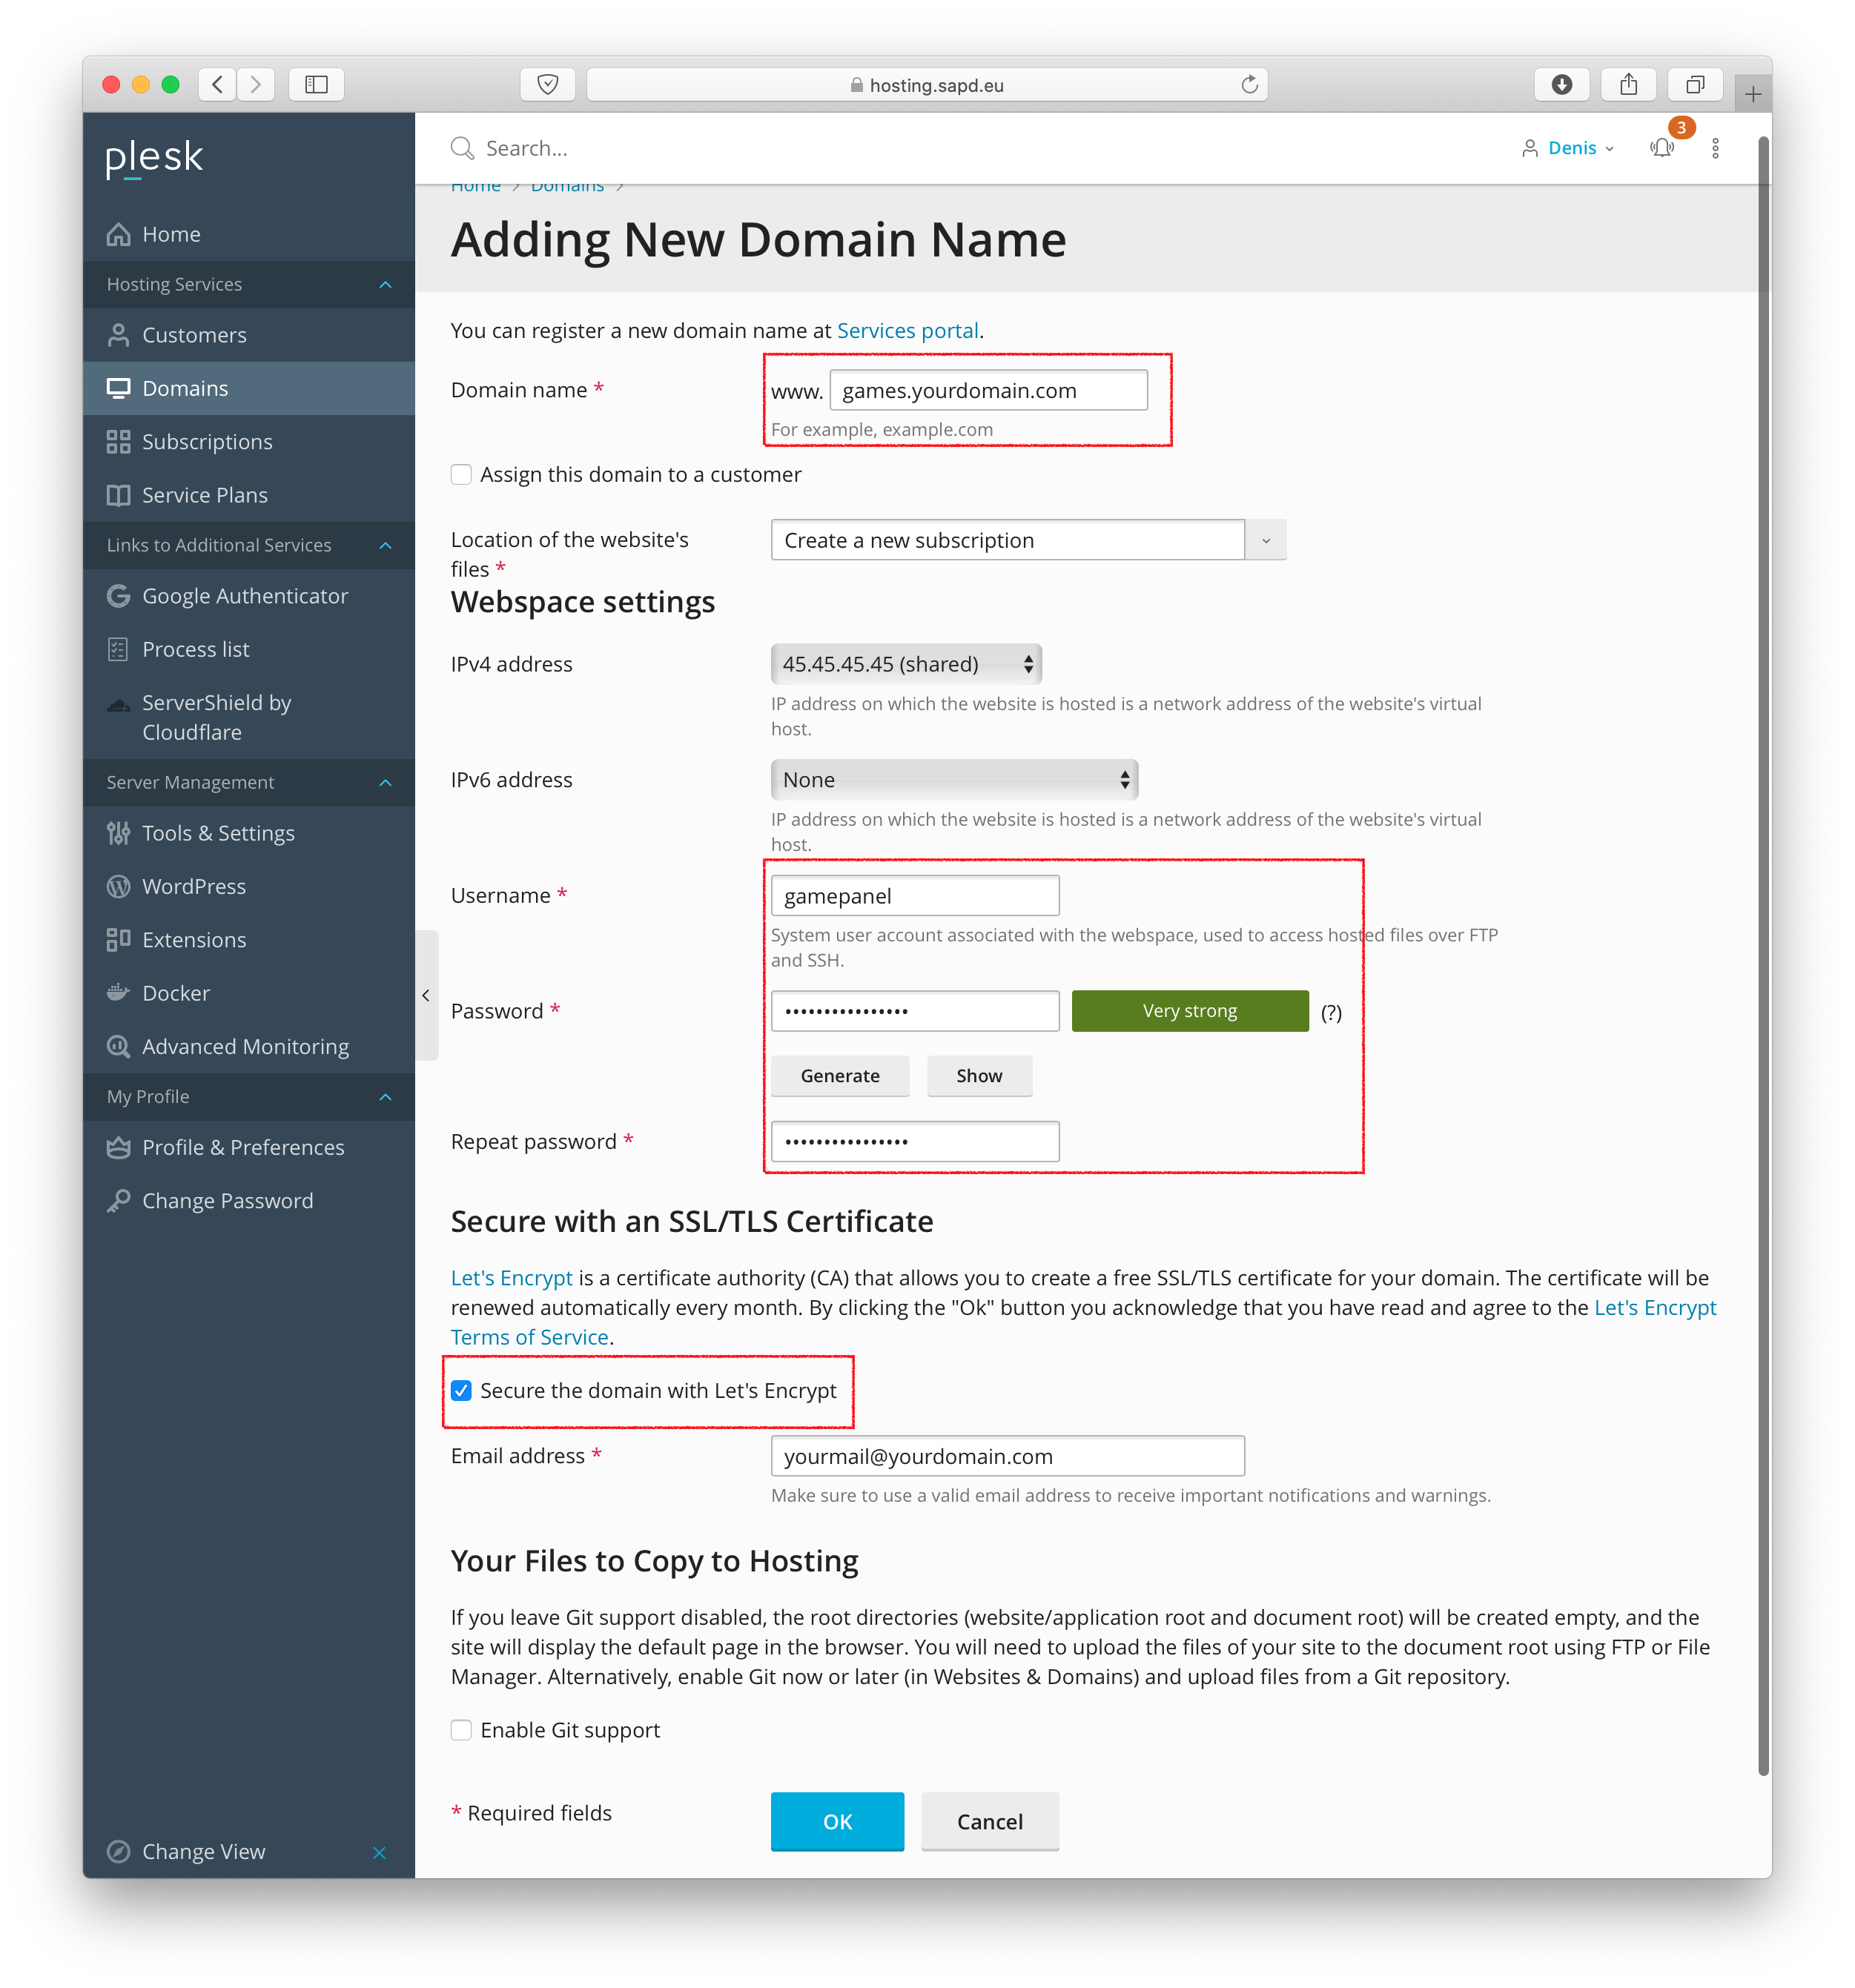
Log into Plesk, go to Domain -> Add Domain (even if you use a subdomain like panel.example.com, click on Add Domain and not on Add Subdomain. This way you can separate the installation of your main homepage).
Type in the full URL of which it will be reached later and make sure to click on Secure the domain with Let’s Encrypt. Remember the username and click on save.
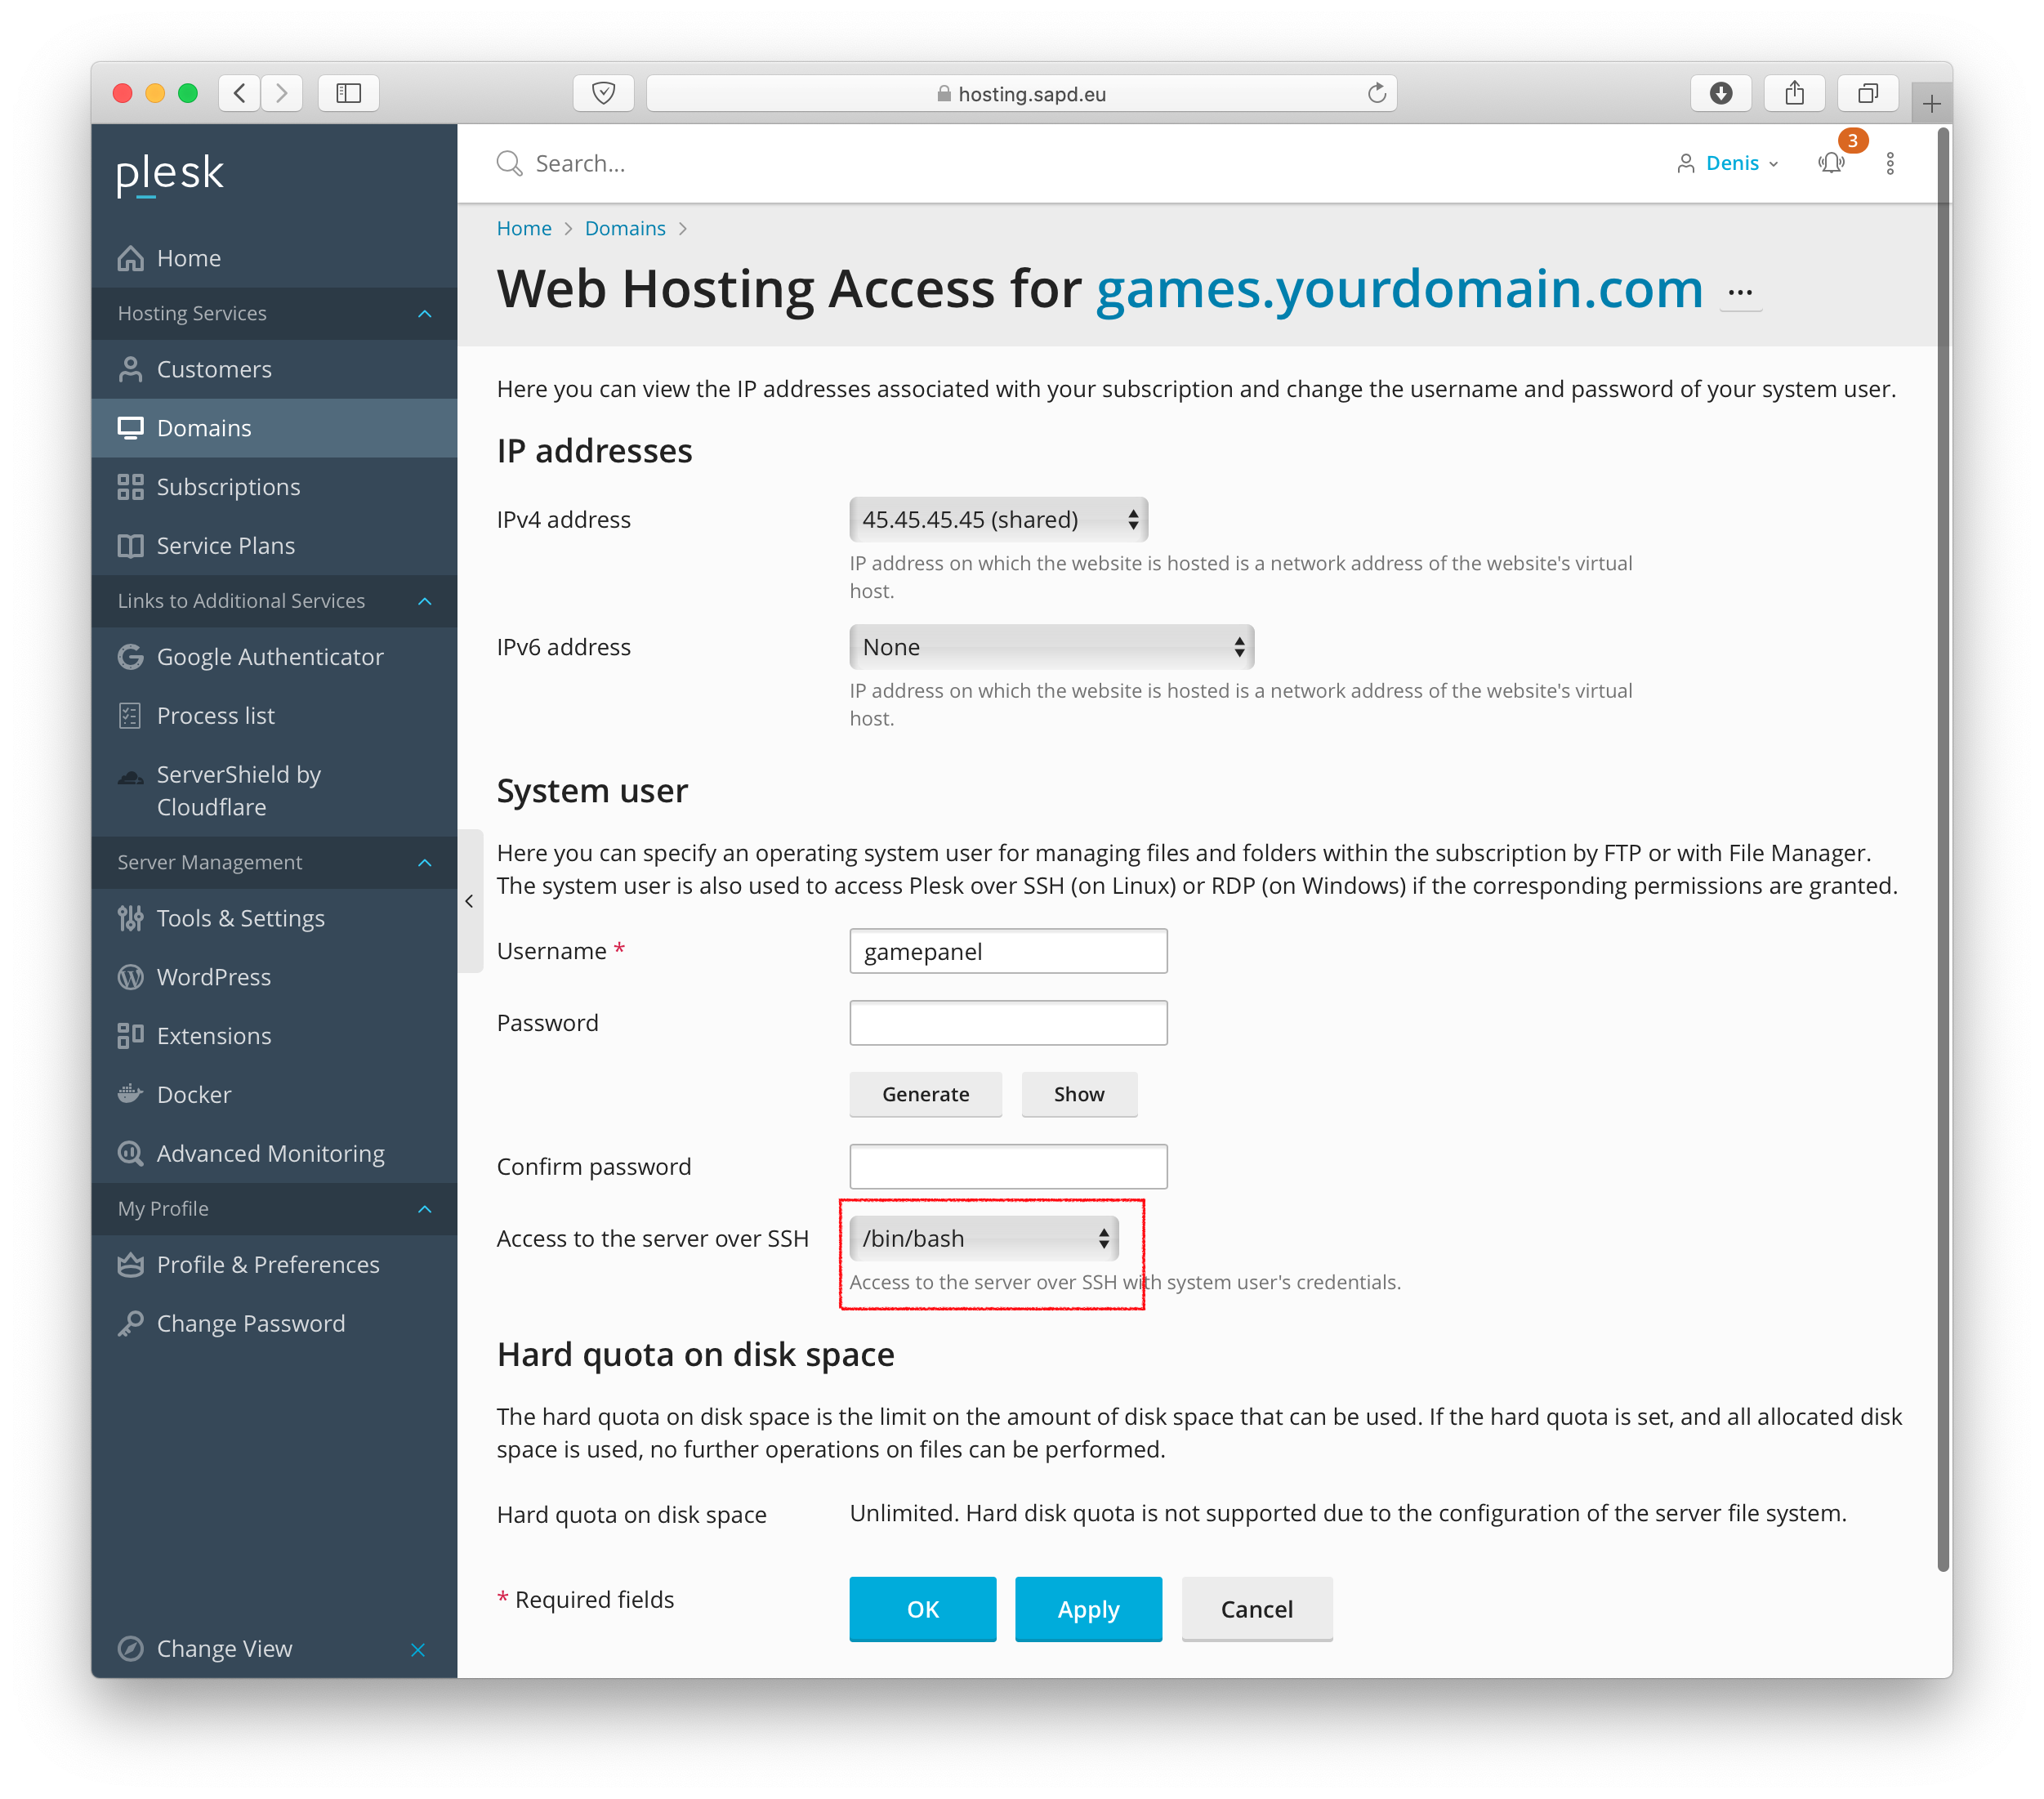
Now we will have to modify some settings on the domain. Go to Web Hosting Access and change Access to the server over SSH to /bin/bash. Also remember the username (gamepanel in this case), you will have to SU into it later.
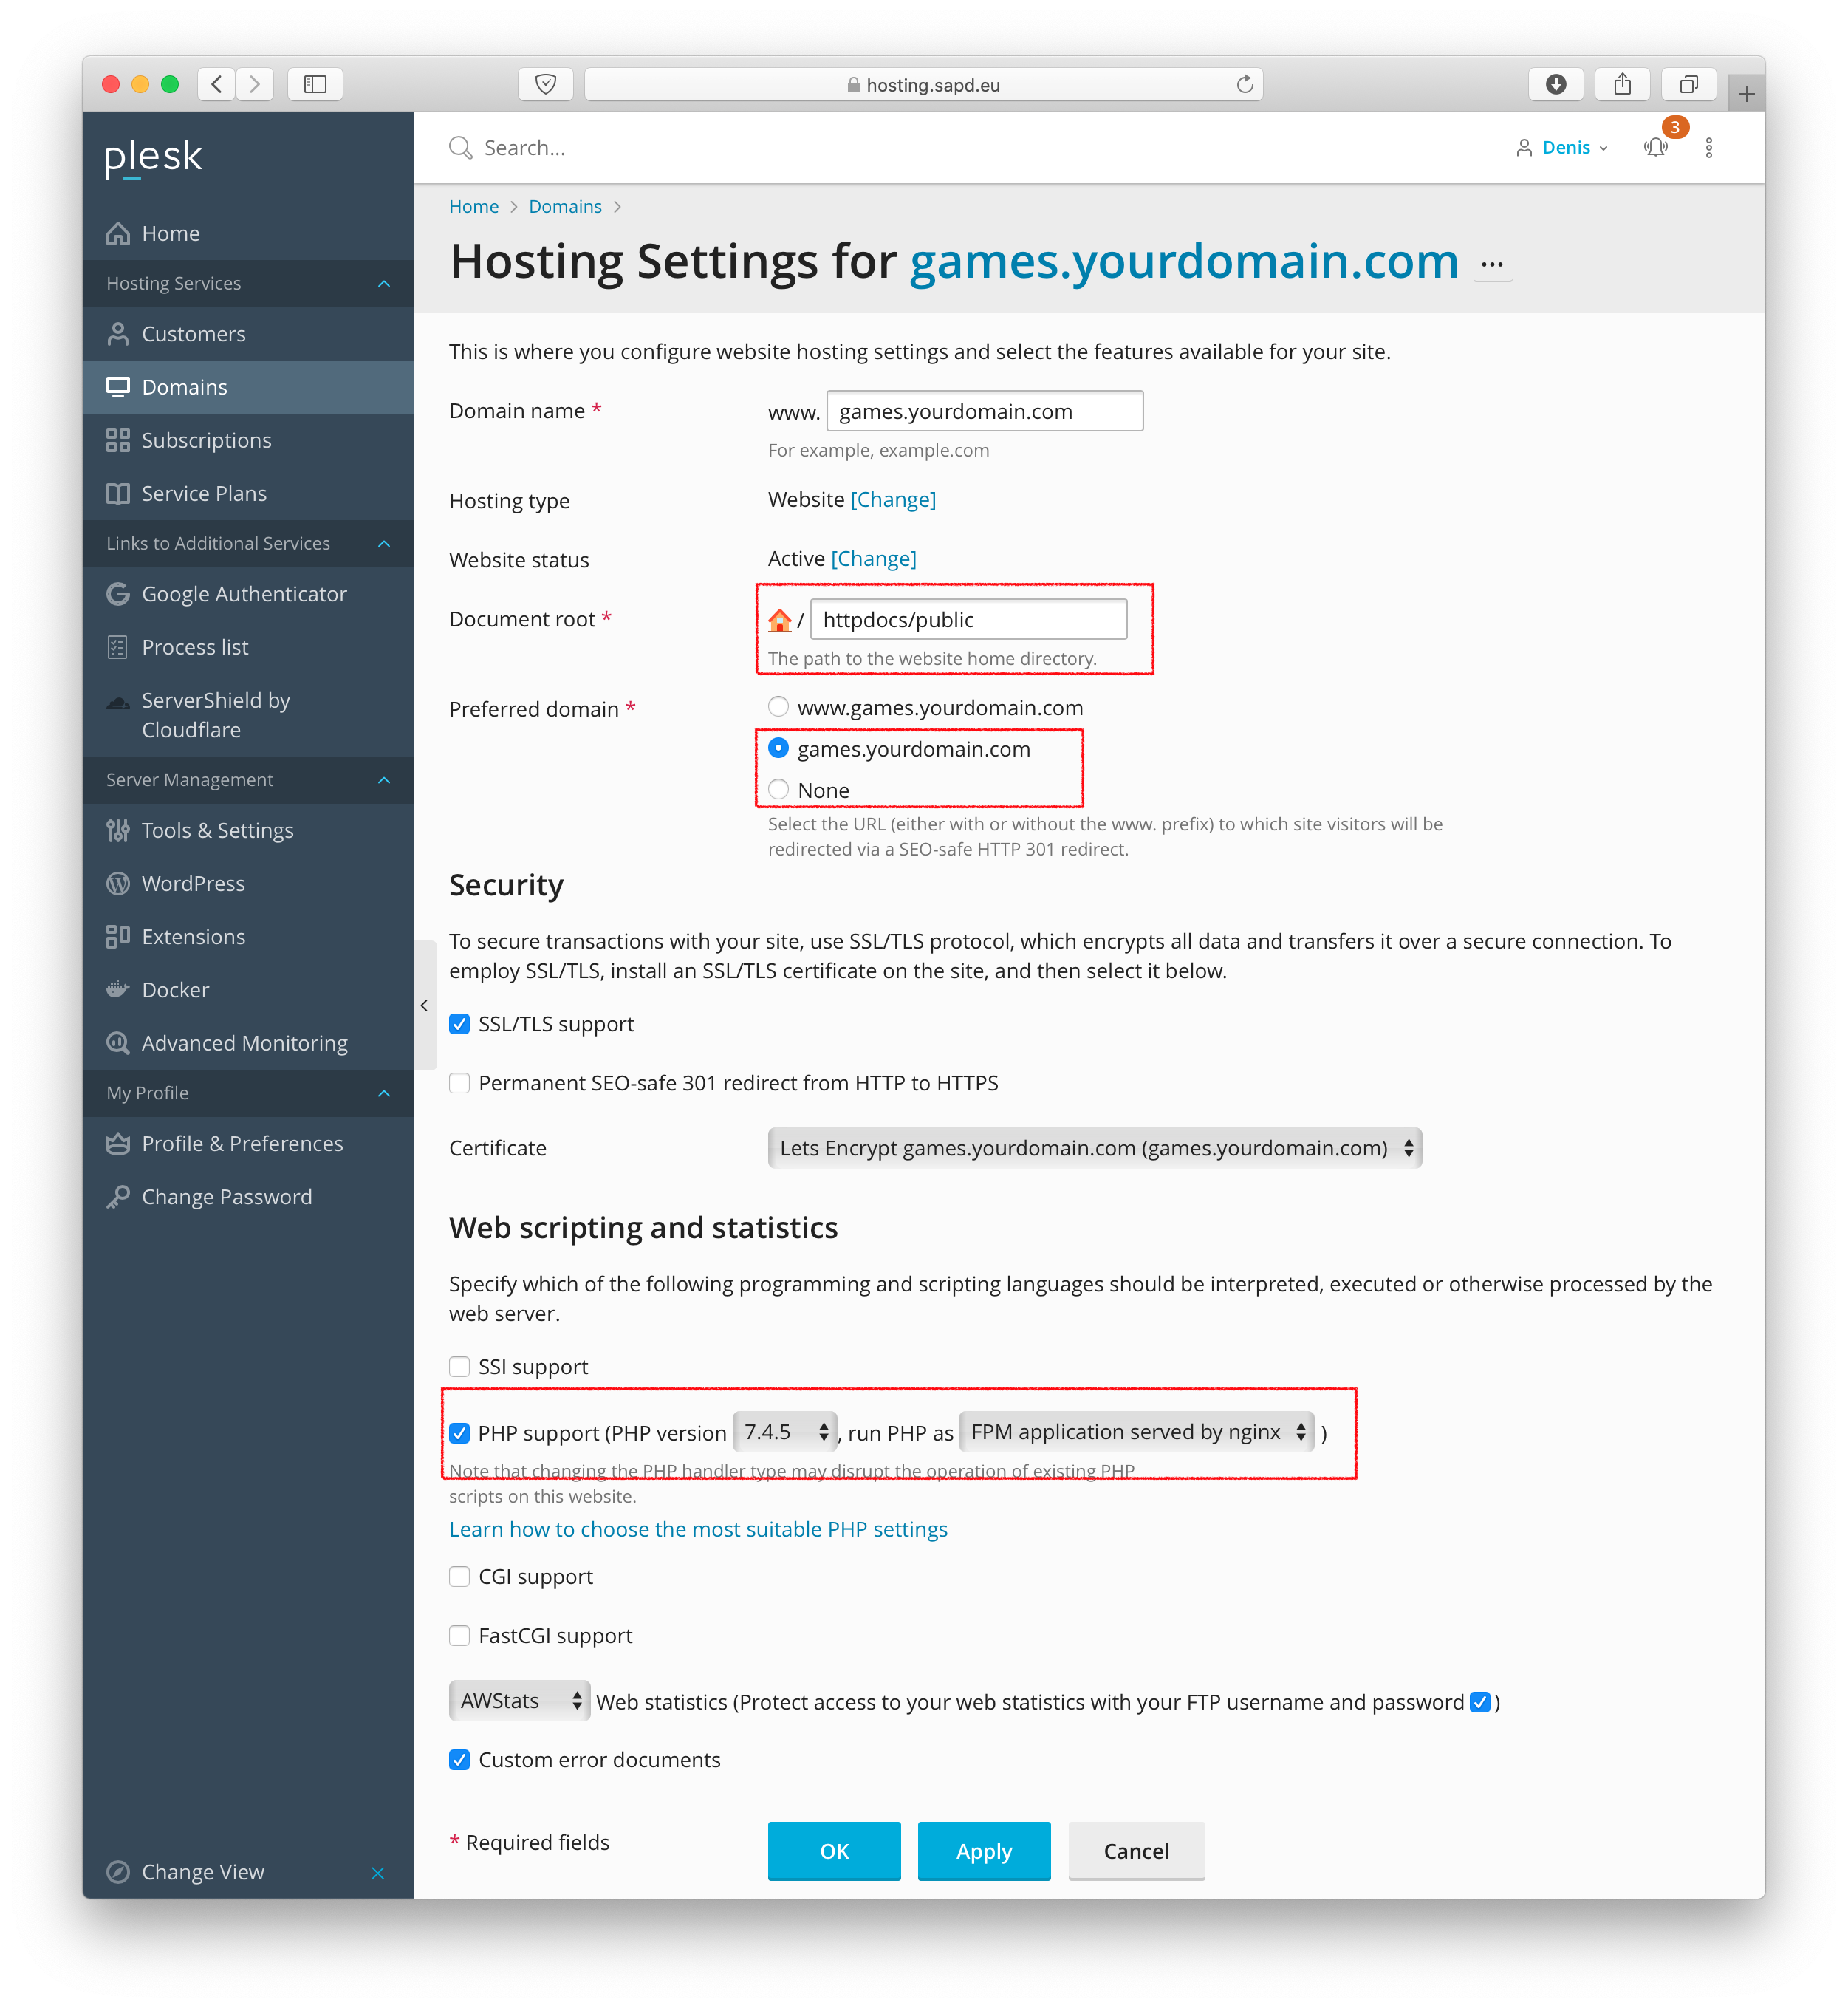
Go to Hosting Settings and set the document root to httpdocs/public and change PHP Support to 7.4 and run as FPM application served by nginx.
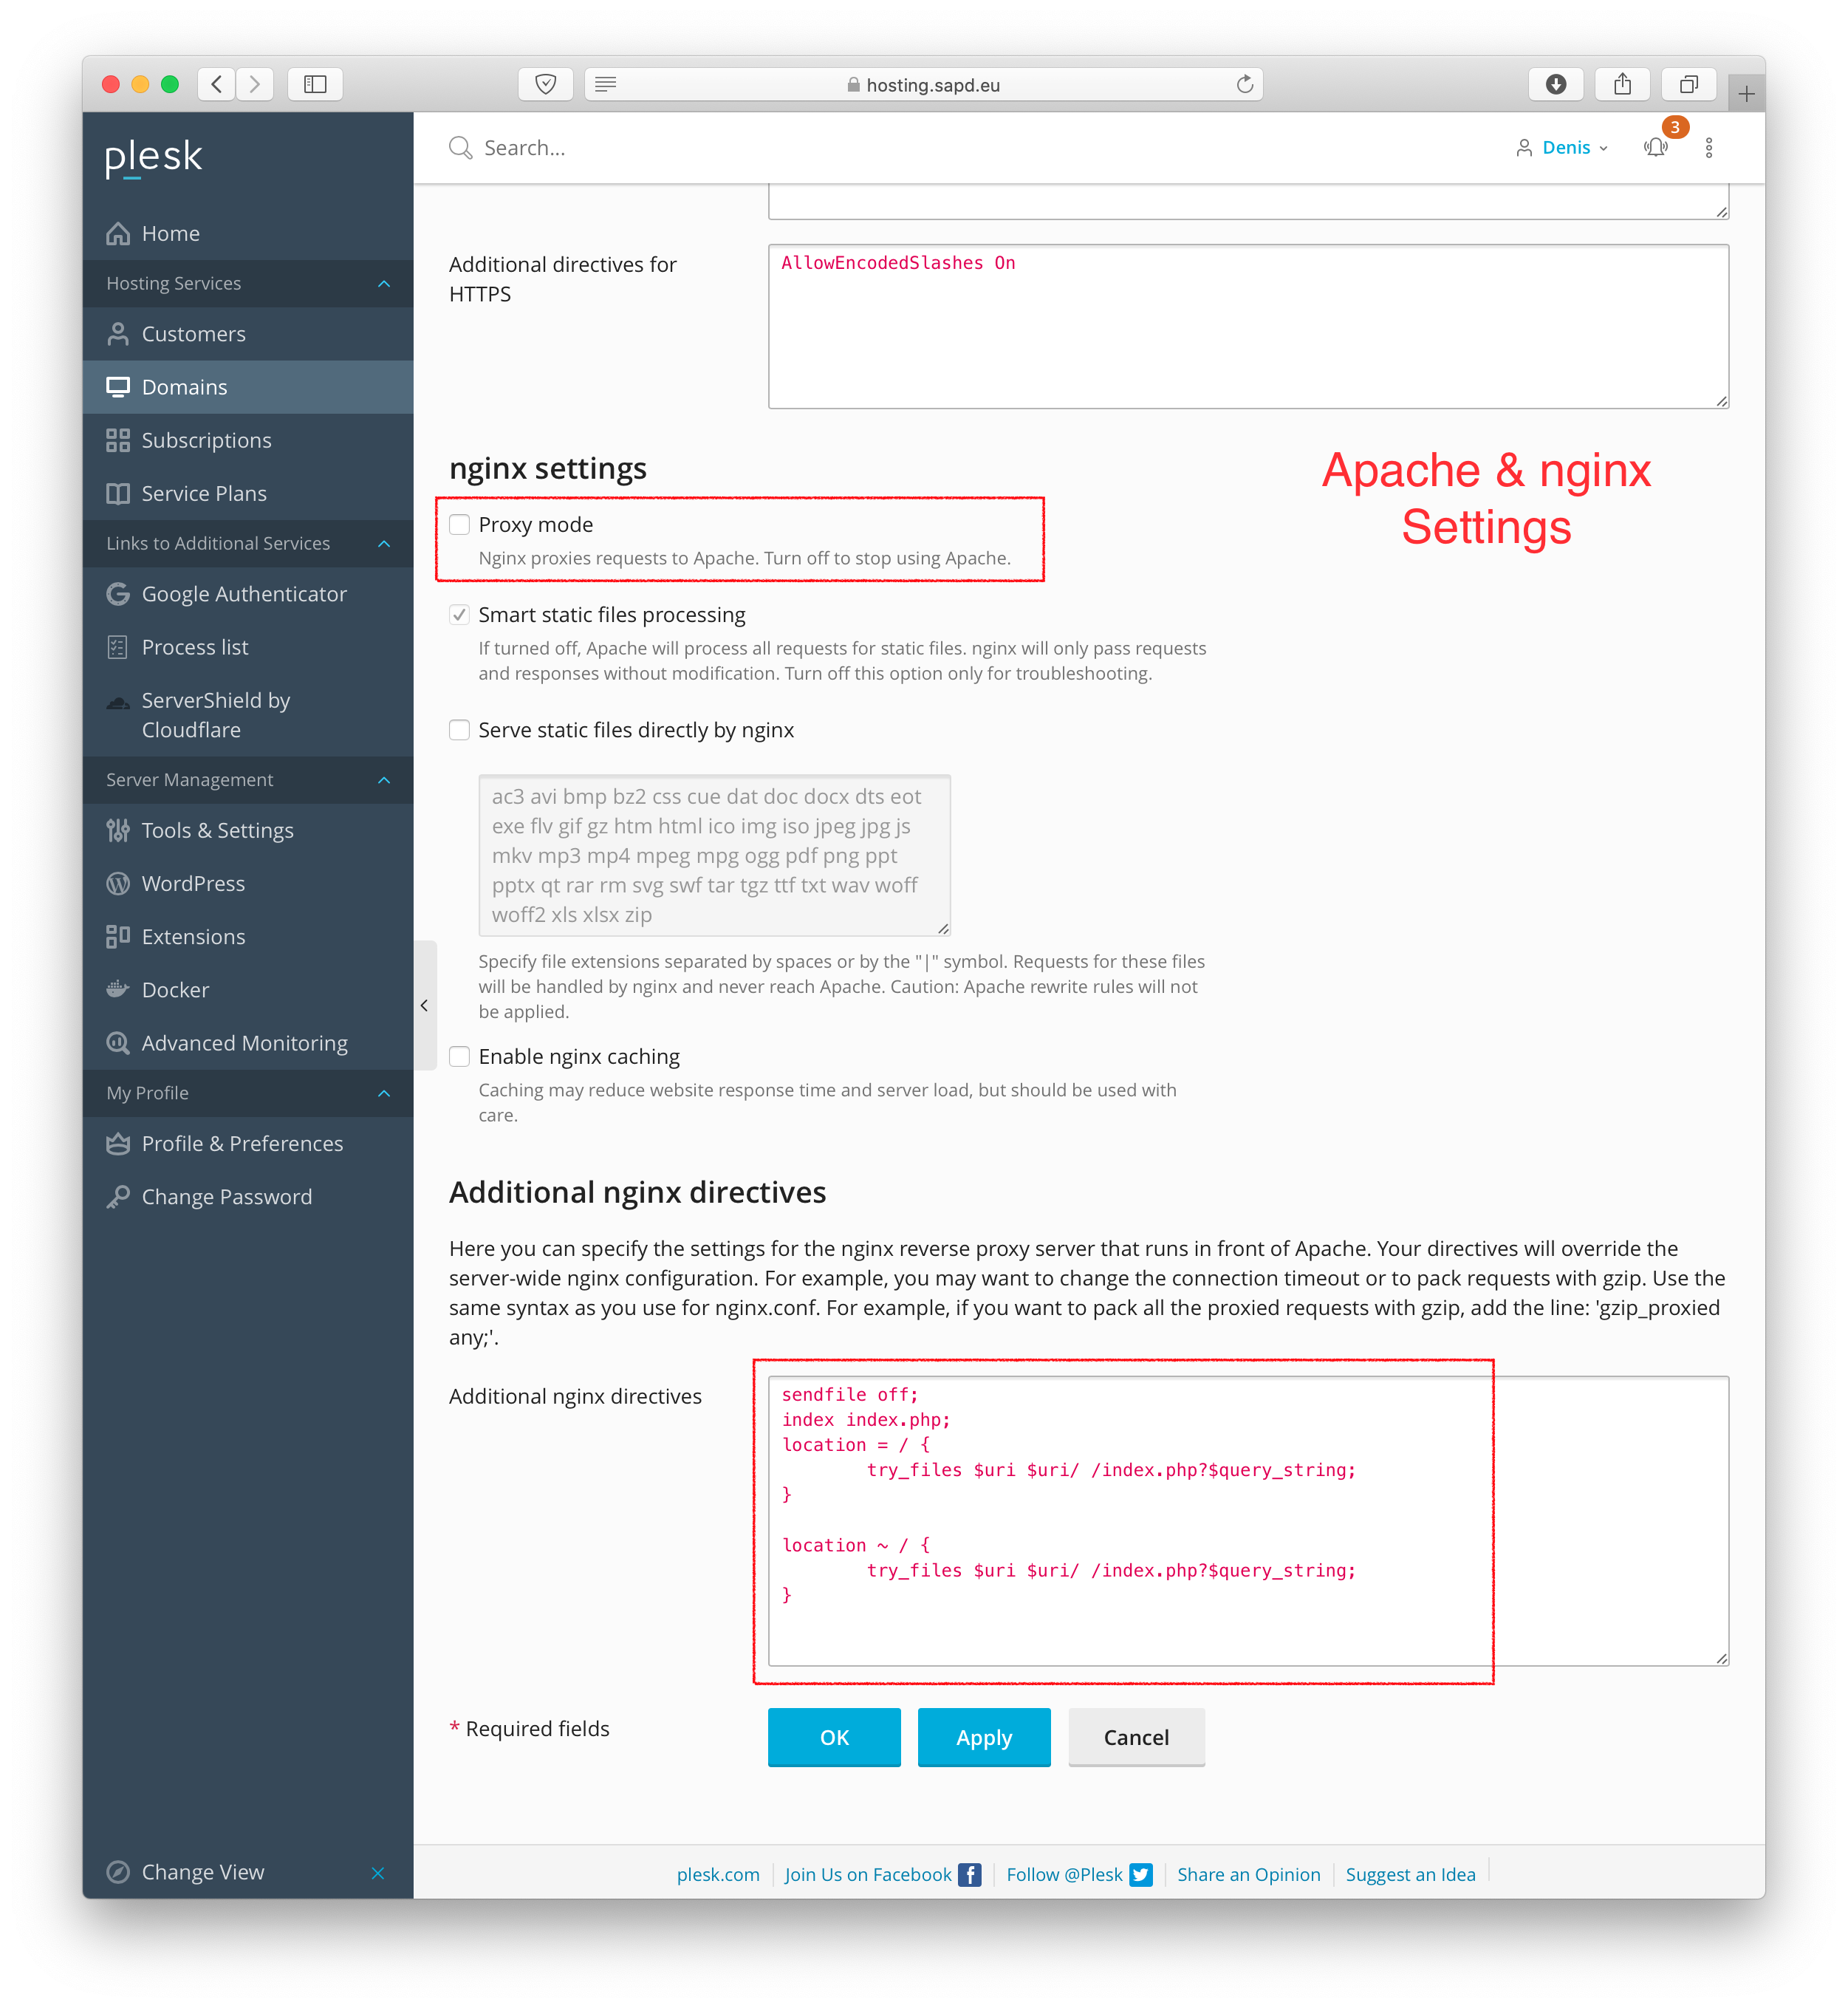
Go to Apache & Nginx Settings, turn off Proxy Mode and write into additional NGINX directives:
sendfile off;
index index.php;
location = / {
	try_files $uri $uri/ /index.php?$query_string;
}

location ~ / {
	try_files $uri $uri/ /index.php?$query_string;
}
You should now create a new database for the panel in the Databases menu (Domain -> Databases (in the menu on the right side) -> Add Database). And remember its configuration. Don’t forget to check “Allow remote connections”.
Installing Pterodactyl
For security reasons and simply because we don’t want to get any permission problems later, we won’t work with root.
(It’s also a little paradox that the official wiki goes through the installation with root, as the Panel advertises with its security. Working with root, especially for beginners, is never safe).
Download and Configuration
While creating your domain/webspace you had to provide a user and a password. SU into that user with su yourusernameforvhost (I named it gamepanel in the screenshots). And simply type cd to get to the home directory.
Create a temporary alias for the PHP-command (you will have to do this each time, you open a ssh session or SU into an user):PHP7=/opt/plesk/php/7.4/bin/php
Install composer locally into the vhost by typing:
curl -sS https://getcomposer.org/installer | $PHP7 -- --install-dir=. --filename=composer
Download and extract Pterodactyl and set permissions:
# Set this to the version you want to install. Look into the docs (see link at the beginning of this post)
PTEROVERSION=v1.1.1

cd httpdocs

# Delete old Plesk default index files
rm ./public/index.html ./index.html

curl -Lo panel.tar.gz https://github.com/pterodactyl/panel/releases/download/$PTEROVERSION/panel.tar.gz
tar xzvf panel.tar.gz

# Correct permissions of caches
chmod -R u+w storage/*
chmod -R u+w bootstrap/cache

# Correct permissions of all files
# folders
find . -type d -exec chmod g+rx {} +
find . -type d -exec chmod o+rx {} +
# files
find . -type f -exec chmod g+r {} +
find . -type f -exec chmod o+r {} +
Run composer:
cp .env.example .env
$PHP7 ../composer install --no-dev --optimize-autoloader
Run the configuration commands as stated in the wiki, but with the Plesk PHP installation. When asked for a database backend, use always the recommended one (Redis / MariaDB). And when asked for MariaDB user credentials, insert the ones you used while creating the database with Plesk:
# Run the first command only, when doing a **NEW** installation (not an upgrade)
$PHP7 artisan key:generate --force

# Choose redis there
$PHP7 artisan p:environment:setup

# Insert the database credentials you created in plesk
$PHP7 artisan p:environment:database

# Choosing SMTP with localhost should work automatically then
$PHP7 artisan p:environment:mail

$PHP7 artisan migrate --seed --force

# Create admin user
$PHP7 artisan p:user:make
You don’t need to set the user for permissions, as we didn’t work with root.
The panel should be available, you can try by going to your panels website.
Troubleshooting: If the panel is not available
If you’re just getting a white page, or a error 500, do a ls -l and make sure, that the files are owned by the user you set (e.g. gamepanel) and have the group psacln. Then make sure that files can be read by everyone (e.g. -rw-r–r–.) and folders can be accessed by everyone (e.g. drwxr-xr-x.); this seems to be a requirement by Plesk. Don’t do a chmod 777!
If there are still issues, look into the folder logs in the home directory of the user. E.g. cd && cd logs then look into the file error_log and especially into the file proxy_error_log
Setting up workers
Go back to Plesk and select your panel domain. Go to Scheduled Tasks (on the right side) and click on Add Task. Choose Script Path and use as file httpdocs/artisan and with arguments schedule:run
Under Run select Cron Style and type in * * * * *.
The following Screenshot shows the old method with Run a Command (which is fine too).
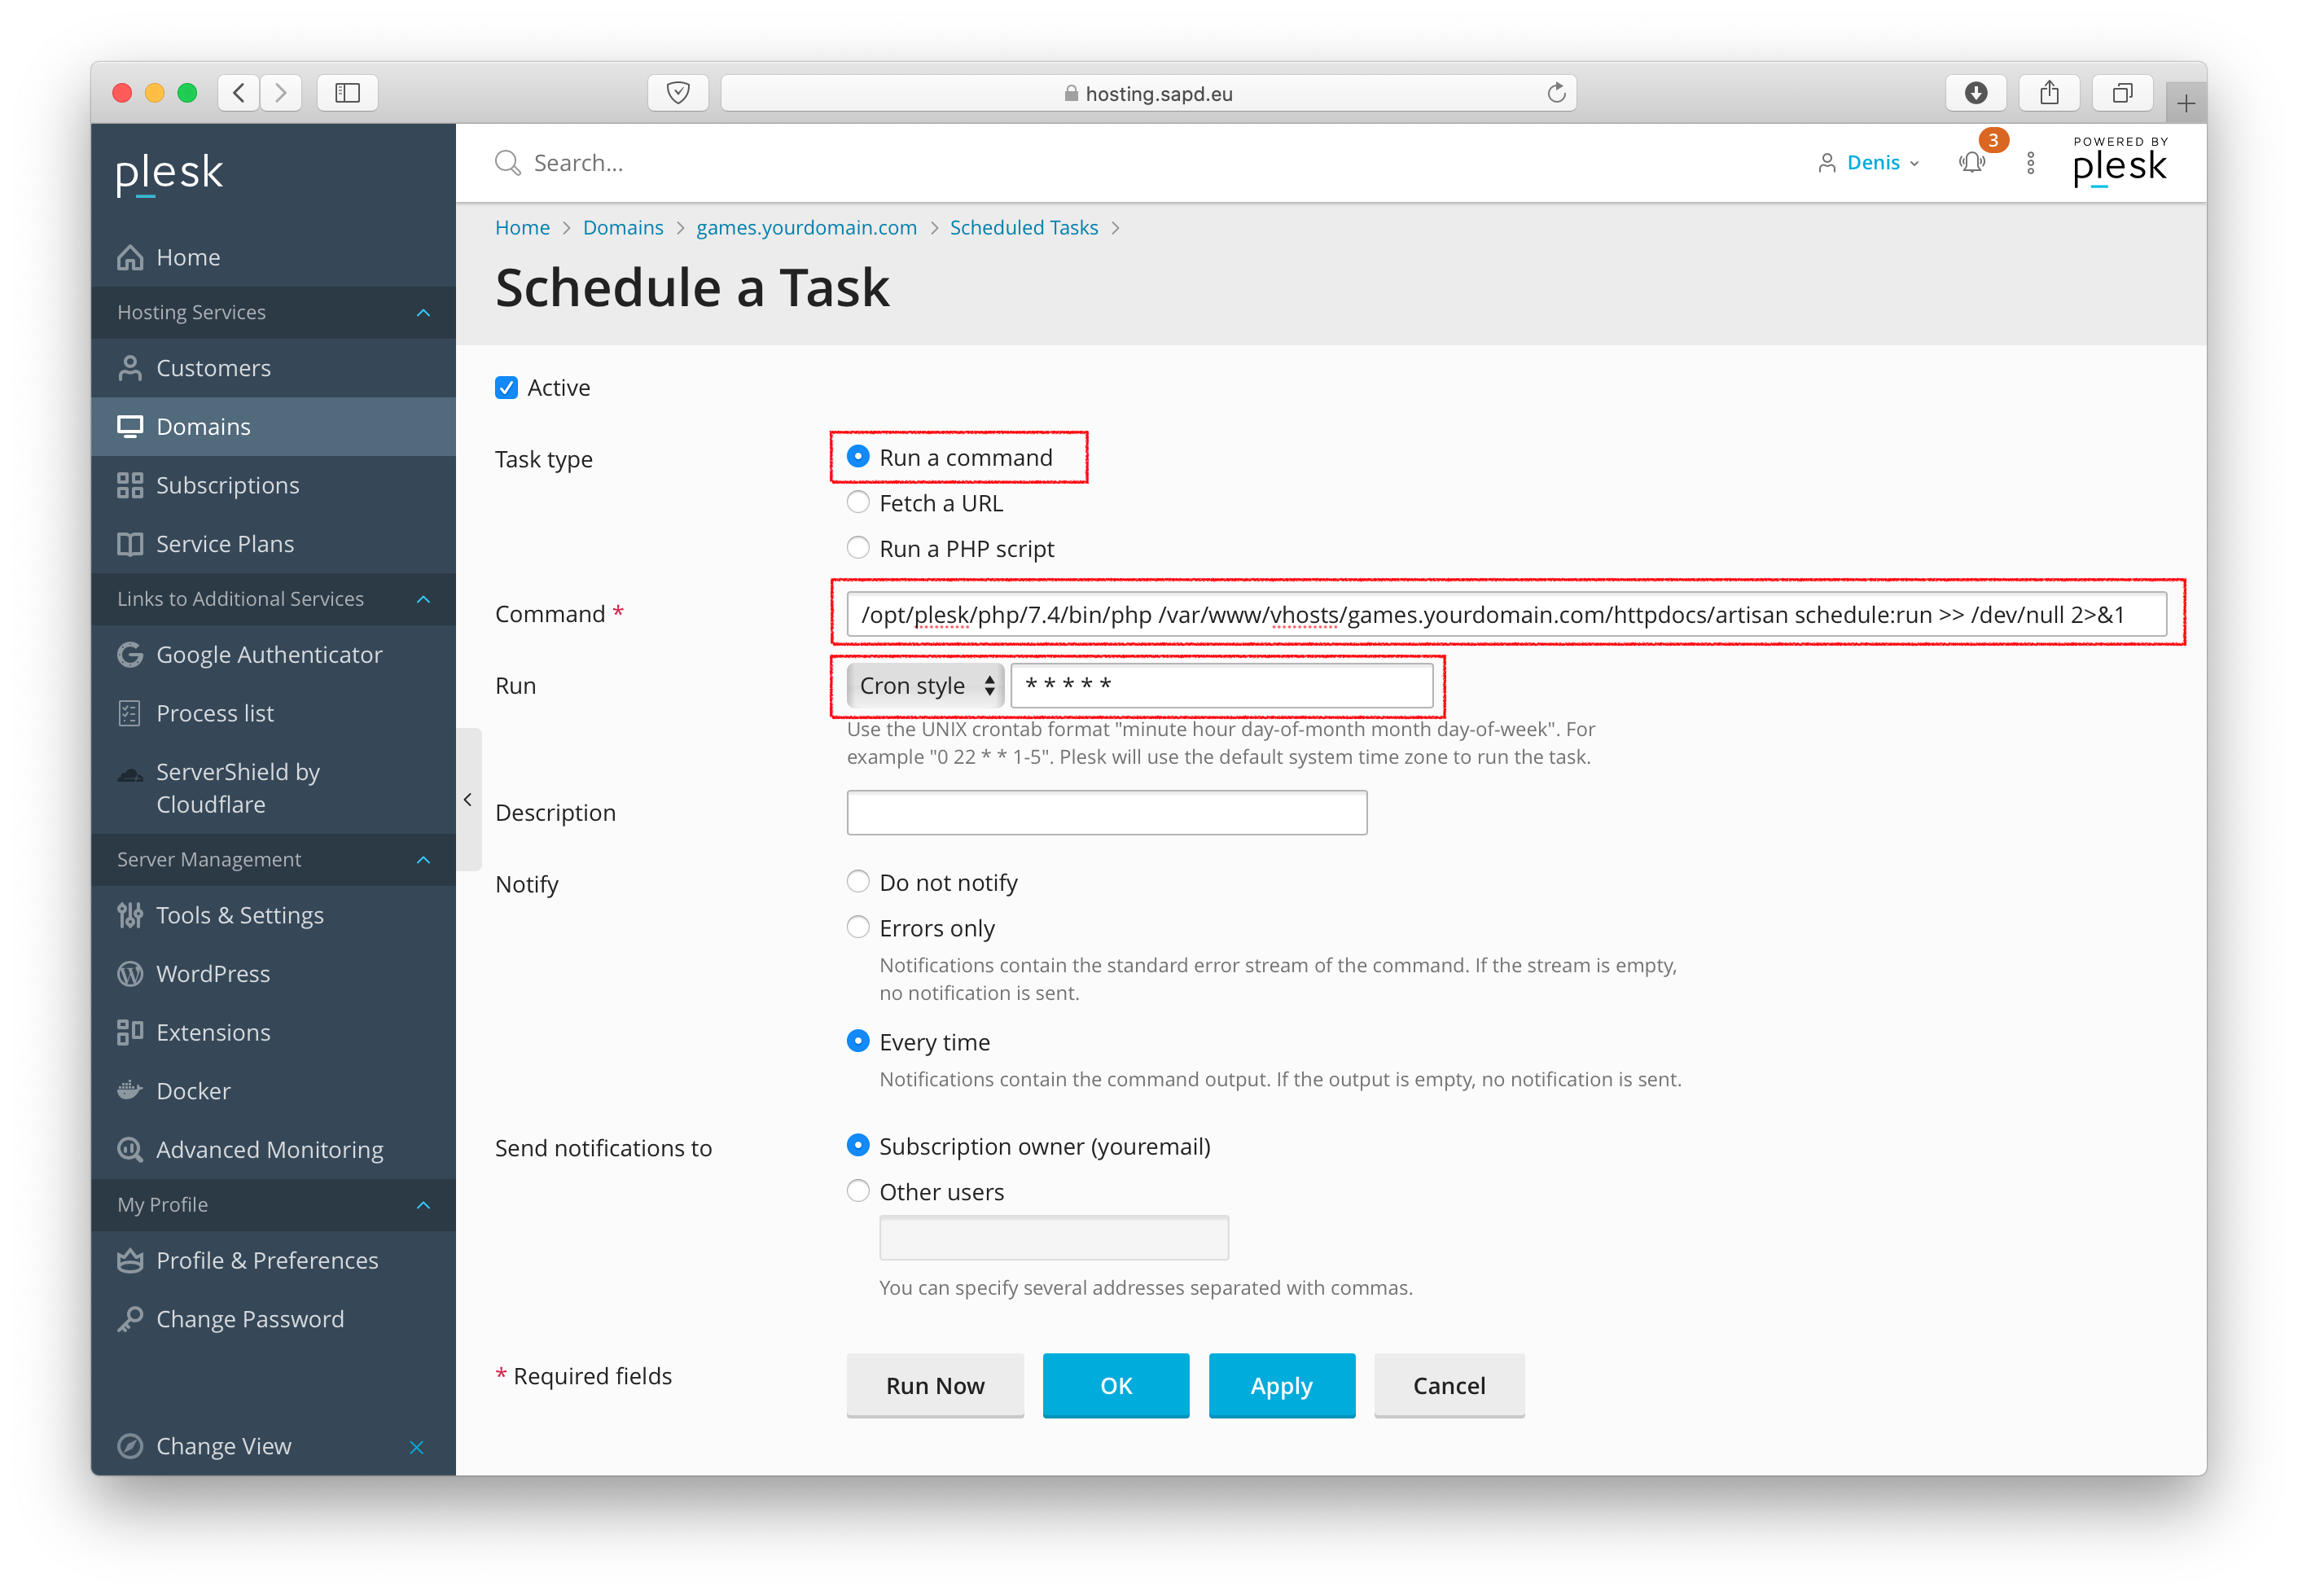
Click on Run Now to test it. Click then on OK.
Setting up SystemD unit
Make sure, that you are still inside SSH. If you’re still in the user, go back to root by typing exit.
As root, enable systemd of your user:
# Replace with the name of your gamepanel ssh user
BASHUSER=gamepanel

loginctl enable-linger $BASHUSER

# now go back to the user
su $BASHUSER
cd # go to home
# Set User ENV for systemd
echo XDG_RUNTIME_DIR=/run/user/$(id -ru) > .bashrc
source .bashrc

# This command now should return running
systemctl --user status
If the last command was successful, you can proceed.
If it is NOT successful, then there is a problem enabling SystemD for your user. In this case, you can create a system-wide daemon: https://pterodactyl.io/panel/1.0/getting_started.html#create-queue-worker. There you would have to use for user the user you created in plesk (e.g. gamepanel), for group use pscln and you would have to replace /usr/bin/php with the php path as done before in this tutorial. The path to artisan must be of course replaced, too.
You must now still be inside the gamepanel bash user. Create a systemd user file:
mkdir -p .config/systemd/user
touch .config/systemd/user/pteroq.service
Into this file .config/systemd/user/pteroq.service insert following:
[Unit]
Description=Pterodactyl Queue Worker User

[Service]
Restart=always
ExecStart=/opt/plesk/php/7.4/bin/php %h/httpdocs/artisan queue:work --queue=high,standard,low --sleep=3 --tries=3

[Install]
WantedBy=default.target
Now start and enable the service with the following command:
systemctl daemon-reload --user
systemctl enable --now pteroq.service --user
Now typing in systemctl status pteroq.service --user should return that it is running successfully.
Installing the Daemon
Proceed to the Wings Docs. I don’t recommend installing the daemon on the same (v)server where Plesk is installed!
When you found an error in my documentation write a comment. You can also write me on Discord: Sapd#4930